Skill level: Intermediate | Estimated time: 20–30 minutes
By default, Judge.me testimonials in Klaviyo email templates are functional but plain. With a few tweaks, you can:

Before (left): Default Judge.me. After (right): Custom styling and tracked links.
Here’s how to do it — without knowing any code. You’ll learn how to use AI to customize the code to paste directly into your template.
Judge.me’s Klaviyo integration uses a dynamic feed to pull recent testimonials into your email template.
Locate the default Judge.me snippet — you’ll find it in the Source Code view of a text block in your email template. If it’s not already added, follow Judge.me’s tutorial to insert it.
Pictured below: Where to add the Judge.me testimonial code inside the Klaviyo text block editor.

Here’s the default Judge.me testimonial snippet you’ll see in the code view — and the one we’ll customize in the next steps:
<!-- Judge.me featured reviews start -->
<div>
  <h4 style="text-align: center; font-style:normal; margin-bottom: 32px;">
    <b>Let customers speak for us</b>
  </h4>
  {% for testimonial in feeds.JudgemeReviewTestimonialsFeed.testimonials %}
    <div style="margin-bottom: 32px;">
      <div style="text-align: center; font-style:normal; font-weight:normal; margin-bottom: 8px;">
        {{ testimonial.content|truncatewords:40 }}
      </div>
      <div style="text-align: center; color: #399999; margin-bottom: 8px;">
        {% if testimonial.rating == 5 %} ★★★★★
        {% elif testimonial.rating == 4 %} ★★★★☆
        {% elif testimonial.rating == 3 %} ★★★☆☆
        {% elif testimonial.rating == 2 %} ★★☆☆☆
        {% elif testimonial.rating == 1 %} ★☆☆☆☆
        {% endif %}
      </div>
      <div style="text-align: center; font-style:normal; font-weight:normal; margin-bottom: 4px;">
        <b>{{ testimonial.author_name }}</b>
      </div>
      <div style="text-align: center;">
        <a style="font-weight:normal; text-decoration:underline;" href="{{ testimonial.product_url }}" target="_blank">
          {{ testimonial.product_name }}
        </a>
      </div>
    </div>
  {% endfor %}
</div>
<!-- Judge.me featured reviews end -->By default, the code displays 5 testimonials — which can overwhelm your email layout, especially on mobile.
Look for this line in the default Judge.me code:
{% for testimonial in feeds.JudgemeReviewTestimonialsFeed.testimonials %}Replace it with this version to show only the first 3 reviews:
{% for testimonial in feeds.JudgemeReviewTestimonialsFeed.testimonials|slice:"3" %}This keeps your email layout clean, easier to scan, and more likely to earn clicks — especially on mobile devices.
Now that you’ve trimmed the list of featured reviews to 3, it’s time to style them to match your brand — without writing code from scratch.
Start by pasting the Judge.me snippet you've edited to display 3 reviews into ChatGPT or another AI tool. Then use prompts like these to direct AI to modify the code's layout and styling:
These small tweaks improve readability, align your review block with your brand, and make your emails look more polished.
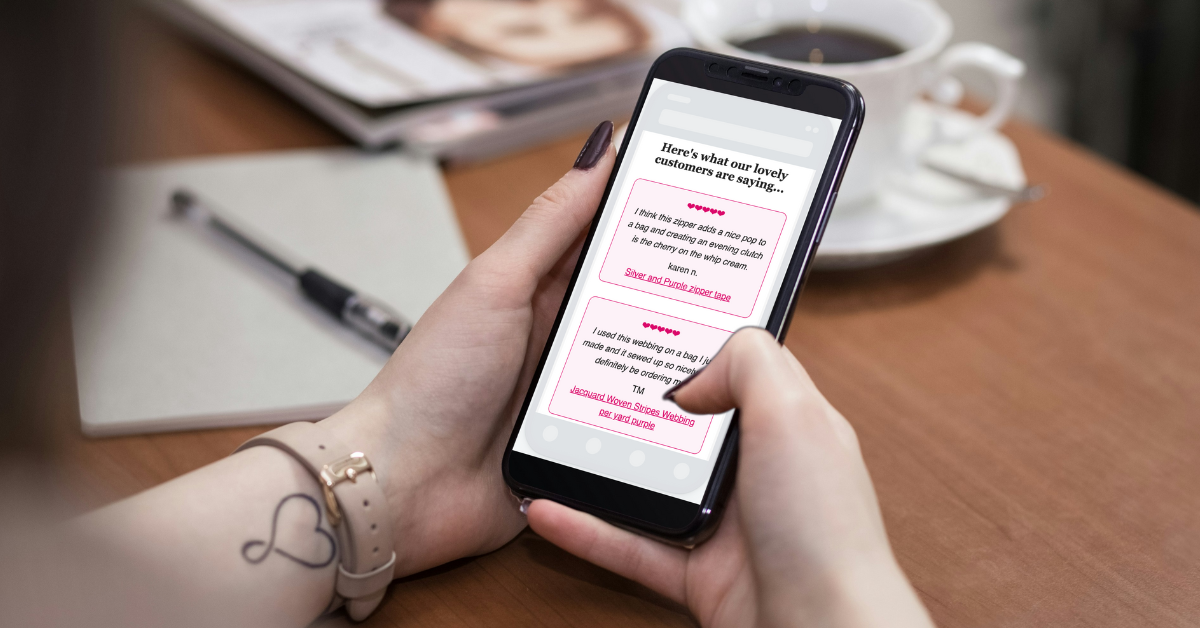
👇 Here's what those changes look like in action:
<!-- Judge.me featured reviews start -->
<div>
  <h3 style="text-align: center; margin-bottom: 32px;">Here's what our lovely customers are saying...</h3>
  {% for testimonial in feeds.JudgemeReviewTestimonialsFeed.testimonials|slice:"3" %}
  <div style="margin-bottom: 32px; padding: 16px; border: 1px solid #DB0B6B; border-radius: 12px; background-color: #FDF2F8; text-align: center;">
    <div style="color: #DB0B6B; margin-bottom: 8px;">
      {% if testimonial.rating == 5 %} ❤❤❤❤❤
      {% elif testimonial.rating == 4 %} ❤❤❤❤☆
      {% elif testimonial.rating == 3 %} ❤❤❤☆☆
      {% elif testimonial.rating == 2 %} ❤❤☆☆☆
      {% elif testimonial.rating == 1 %} ❤☆☆☆☆
      {% endif %}
    </div>
    <div style="font-style: normal; font-weight: normal; margin-bottom: 8px;">
      <em>{{ testimonial.content|truncatewords:60 }}</em>
    </div>
    <div style="font-style: normal; font-weight: normal; margin-bottom: 4px;">
      {{ testimonial.author_name }}
    </div>
    <div>
      <a style="font-weight: normal; text-decoration: underline;"
         href="{{ testimonial.product_url }}?utm_source=Klaviyo&utm_medium=email&utm_campaign=judgeme_block"
         target="_blank" rel="noopener">
        {{ testimonial.product_name }}
      </a>
    </div>
  </div>
  {% endfor %}
</div>
<!-- Judge.me featured reviews end -->
Changes included:
By default, Klaviyo doesn't track link clicks from the Judge.me code snippet — which means you’re missing out on valuable insights. Adding UTM parameters to the product links lets you track how your testimonial block is performing in both Klaviyo and Google Analytics.
This is especially helpful if you want to test the placement or styling of your review section. If it’s driving clicks, great. If not, A/B test placement and styling.
Locate this line in the Judge.me code:
<a style="font-weight:normal; text-decoration:underline;" href="{{ testimonial.product_url }}" target="_blank">Replace it with this version including UTM parameters:
<a style="font-weight:normal; text-decoration:underline;" href="{{ testimonial.product_url }}?utm_source=Klaviyo&utm_medium=email&utm_campaign=judgeme_block" target="_blank">Explanation of the UTM tags:
utm_source=Klaviyo → Identifies Klaviyo as the source platformutm_medium=email → Identifies the marketing channelutm_campaign=judgeme_block → Identifies the judge.me review blockThis brand replaced the default star icons with their own styled version, added a soft peach background, and made product titles clickable for easy tracking.

Before (left): Standard Judge.me layout. After (right): Customized layout with branding and tracking.
This brand swapped the default star icons with custom ones in their signature yellow, added a border in brand colours, and made each product title link trackable for email engagement insights.

Before (left): Default Judge.me. After (right): Custom styling and tracked links.
I work with Shopify brands every week to set up email flows and implement custom Klaviyo features like this one. Join me at The Social Sales Girls where I coach and teach email marketing strategies.